Repeating Heading Rows in a Long MS Word Table

From the very beginning, Word users have had the ability to create tables in their documents to easily organise information in neatly aligned rows and columns.  Word tables can also be easily modified, if you need to add or delete rows or columns as your document evolves.  You can find all of these actions readily available on the left of the Layout tab attached to the Table Tools at the top-right of the screen. (These actions are also available on the right-click menu when your cursor is positioned anywhere within your table.) Indeed, if all you seek is to add a new row on the end of your table, all you need to do is to position your cursor in the last cell of your table’s last row and then press the Tab key. Your table will immediately grow by one row.

However, you might find a problem emerges if your table needs to extend beyond one page, as might be the case with a longer catalogue or phone listing.  As you table extends to a greater length, you may find that most of your table is lacking the context that is provided by the headings on your first row, as in the example below:

First NameLast NameDepartmentPositionStart Date
HughTwelftreeAdministrationAccountant22/3/2015
CarolWellingsMarketingDirector18/5/2017
KimMagnussenProductionManager27/10/18

As your table extends over two, three or more pages, you will inevitably leave behind the headings in your first row on the table’s first page. What you need is to be able to have the same headings in the first row of your table on each successive page, so that you are able to meaningfully interpret your table data on whatever page you are viewing it.  The obvious way of achieving this is to simply copy and paste the headings from the beginning of the table to the first row of the table on each following page. 

But the drawbacks to this solution are also obvious.  It would be tedious and time-consuming to do this in a long table that might run across numerous pages.  And it also becomes problematic if you subsequently add or delete rows to your table, after you have pasted your headings to the appropriate new location.  If you do modify your table in this way, it will inevitably mean that your headings will move around and will be out of place.

Happily, there is a better, faster and much more elegant solution.  You can create and build your table to whatever length you need or wish.  Then, just position your cursor anywhere in your table’s heading row.  Go to the Layout ribbon at the top-right of the Word screen and select Repeat Header Rows.  As a result, the first row of your table on each page will always display the same headings.  And this will continue be the case, even after you add or delete rows to your table as your document evolves; there will be no need to modify your table to retain your headings in the right location. Of course, if you have greater ambitions for your table, particularly if your table is intended to contain numerical data and calculations, then maybe a better choicewould be an Excel spreadsheet. There is a strong argument to be made for using each member of the Microsoft family according to its strength, and for any task involving numbers and mathematics, Excel is really your go-to option Explore this option starting here.

Section Breaks in MS Word

One of the key foundation concepts that separates the genuine Word guru from the wanna-bee is the judicious use of section breaks in your longer, more elaborate documents.  Taken together with the use of styles, as discussed here, they create a very useful platform in the design and structure of your Word document that makes many other features possible or at least much easier.

Your longer Word documents are bound to contain clear subdivisions. An obvious example would be chapters in a report or manual (or even novel, should your ambition lead you in that direction).  If you separate your document’s chapters with a section break, it gives you the power to treat individual chapters effectively as individual mini-documents within the whole document.  Which means that your chapters could have attributes that, without section breaks, can only be applied to entire documents.

For example, individual sections can have their own unique vertical alignment, margin measurements, page numbering and headers and footers among many other features.  In this way, having separate sections in your document gives you the ability to effectively ‘mix and match’ different layouts and page formats within the same document.  If necessary, each section can function as a separate entity on its own within the document, so you could modify (add to, or delete from) the content of one of your chapters without having any effect on the content or pagination of any other chapter.

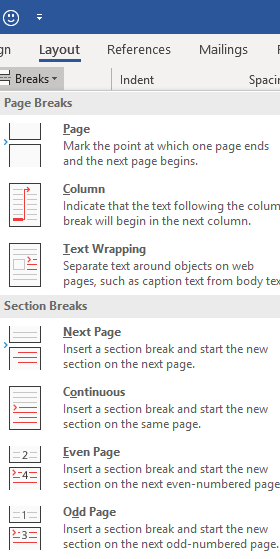
To insert a section break, you need only position your cursor at the required location, such as the intended beginning of a chapter. Find the Breaks menu on the Layout tab, and you will see a selection of different breaks, the first of which is the ordinary manual page break.  It should be stressed that this is entirely separate and distinct from the section break; you can, and very likely will, have many separate pages within the self-same section.  The manual page break simply determines where a new page begins; it does not begin a new section.

There are a number of different breaks you can easily insert via this menu, with the exception of lunch or coffee breaks. (Oh stop it, you wacky funster – Ed.) If you are seeking to separate chapters, the most relevant option would normally be the Next Page section break, the first choice in the lower part of the menu which means that your new chapter would begin at the beginning of a new page.

If you do divide your document into self-contained sections, you may find it useful to add the section indicator to the status bar at the foot of the Word screen; otherwise, you may not be able to easily tell which section you are currently located in a long document.

Simply right-click anywhere in the status bar and select Sections from the ensuing menu to turn on the section indicator; Word does not display this indicator by default.  By keeping one eye on this indicator as you move around your document, you will always know precisely what section, as well as what page, you are on.

Look out for future posts which will delve more deeply into the use of section breaks in conjunction with headers and footers.

Creating a Table of Contents in MS Word

Using styles, as described here, as a standard policy in your longer, more elaborate Word documents really opens up your horizons, and facilitates the simple creation of many additional features. One of the easiest and most impressive of these is a table of contents.  If you have the foresight to use styles as a standard formatting feature (i.e. Heading 1, Heading 2, Heading 3 etc.), you can then simply insert the Table of Contents field on your chosen page at the beginning of the document and have it automatically compile a table of contents, using the headings and subheadings already present in your document.  This would provide you with an enormous saving of time and effort, compared with the tedious task of having to manually type up your own table of contents in neatly aligned columns.

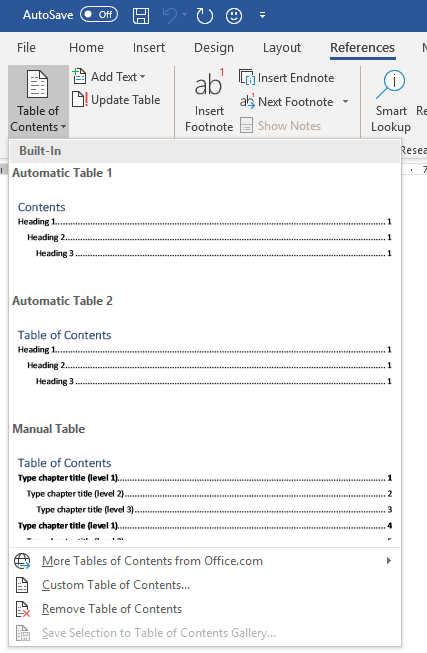
You will find the Table of Contents command on the far left of the ribbon attached to the References tab:

If you select either of the Automatic Table options (1 or 2) on the attached menu, the Table of Contents field will then go to work to automatically create the table of contents as you watch. 

One of the principal virtues of this feature is the ability to easily update and regenerate the table, in the event that you modify your document after creating the table. If you add new content with new headings or move the location of your document’s content around in a way that impacts the page numbering, you don’t need to create your contents table anew. You can instead simply update the Table of Contents field, and have it automatically regenerate itself to incorporate and take account of any recent document alterations.

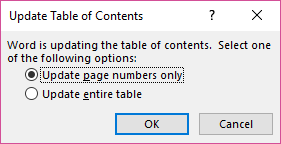
You can perform such an update via the right mouse menu, Simply right click somewhere over your Table of Contents and select Update Field. You will then be asked whether you wish to re-create the entire table or only the page numbering. (You can access this action even faster via the equivalent keyboard shortcut, the F9 key):

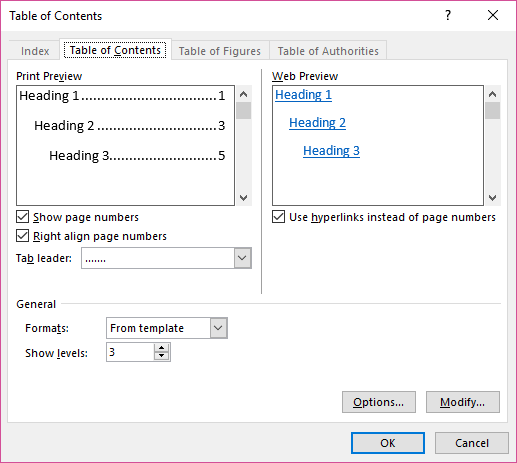
You can also customise the built-in automatic tables of content if you wish; choose a different style for its appearance and, if need be, specify precisely which Heading styles you wish to include in or exclude from your table.  You can simply select the Custom Table of Contents option from the Table of Contents menu to access a dialog box that presents you with these choices.  You can modify your Heading Style selection via the Options button in the lower right-hand corner.

Like many other fields that are available in Word, the Table of Contents gives you a great method of automating, and then flexibly updating, a key feature of your longer, more involved, elaborate Word documents.

“Warp Speed” Charts in Excel

One of the more impressive and dynamic feature presentation features in MS Excel is charting.  However, in successive versions, the folks at Microsoft have been unable to stop themselves from expanding and complicating Excel’s charting feature to the point where it has become possibly the best exemplar of ‘program bloat’ in the Office family.

For the average Excel user, henceforth, chart creation and modification can be, at best, a time-consuming diversion and, at worst, a confusing and confused labyrinth of excessive choice.  There is, happily, good news for user who is time-poor and seeking to adhere to the sacred principles of KISS.

It is possible to generate a useful chart in Excel via just one keystroke.  You need only select the range of cells in your spreadsheet containing the labels and values that you wish to portray on your chart.  Then, just press the F11 function key on your keyboard and stand back to be amazed!

Excel will instantaneously create a brand new sheet in your workbook, containing a chart based on your selected range of data

A default chart sheet generated in mere seconds with the F11 key

You will immediately have a default 2 dimensional column chart.  Of course, this chart might not be be of a type or format that meets your needs; if so, you can then modify your chart by employing the vast and diverse range of tools to be found on the Chart Tools tab that will appear at the top of the screen whenever your chart window is active.

But if the default chart is enough to meet your needs, very possibly the F11 key is all that you will need. A knowledge of this little-known simple Excel maneuver is also likely to impress your colleagues and workmates, who will likely view you with a new respect and, dare one hope, awe.

For more on charting and other Excel presentation strategies, look for upcoming posts…