In a recent post, we discussed how you might like to set up some simple protection in your shared spreadsheet, to prevent other users from entering incorrect data into the wrong cells or ranges. But if you are slightly more ambitious with this concept, and are keen to steer your colleagues or any other users along the correct path in their use of your shared spreadsheet, you might choose to take your security to the next level by taking advantage of a feature called validation. In this way, you can not just determine whether or not other users can type into particular cells, but what they can actually type (i.e. numbers within a particular range, valid department names chosen from a list etc.) Used judiciously, it can be a very effective way to avoid errors or corruption in your spreadsheet that might otherwise undermine your entire efforts.
When using this feature for the first time, a good practice can be to try it out on just one cell, as a test case; you can easily copy or extend your validation settings to a larger or longer range afterwards, an option that we will discuss in more detail below.
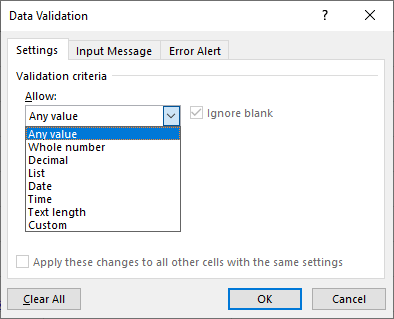
First, select the desired cell that you want to use as your test case, and then select ‘Data Validation’ from the Data tab. If need be, select the leftmost tab called “Settings” in this screen, and select the type of value you are working with from the ‘Allow’ menu, such as ‘Whole number’:

Once you have made this selection, you can define your required the parameters in the lower part of this screen (i.e greater than, less than, between etc.). This choice alone will define the validation rule for your selected cell; should you now immediately select OK at the foot of this screen, the user would need to follow this rule when entering values into this cell. Should they err in this process, a warning will appear to inform of their transgression:

The message is rather vague and therefore unhelpful. You might well choose to customise this message and make it more personalised and enlightening to your fellow user. You can do so via the ‘’Error Alerts” tab in the same original Data Validation window. Here you can select which icon to display in your warning, give it a suitable title, and then type your desired, appropriate content in the ‘Error Message’ box on the right hand side.
You can provide even more guidance to your users in the same Data Validation screen, via the ‘Input message’ tab. The input message is a prompt that appears on the screen when you first select the cell with the validation settings defined, and can alert the user, if required, as to what they should be typing to do the right thing and avoid error. Your Data Validation rule can potentially include all three features:
The essential Settings that define the rule to control any entry in the chosen cell(s). This is the only mandatory part of this feature.
An Input Message to inform the user of the rule’s requirements
An Error Alert that appears if the user ignores the prompt and makes the error.
It might be tempting to personalise your error message in an attempt to be humorous or derogatory. (For example, “Wrong number, you muppet!”). This is an impulse best restrained, especially in our current litigious age. You are on much safer ground with a more neutral, encouraging message. An example might be of the “Bad luck, try again” ilk, with an explanation of why their entry was in error and how they might correct it.
If your validation settings are working for you on your ‘test case’ cell, you can extend the validation to a larger range easily. All you need to do is to select the range required, along with your test case cell. Then, you can simply select the same Data Validation option on the Data tab,and you will be presented with the following screen:

Click on Yes, and all of the cells would have the exact same validation rule.
If you acquire confidence in the use of this validation feature, you can be quite creative with it. For example, if your spreadsheet needs to filled in with some text values, for example department or suburb names, you can use validation to define a list in an interactive menu that your user can choose a valid entry from. Look for a post in the near future on this subject.


