Repeating Heading Rows in a Long MS Word Table

From the very beginning, Word users have had the ability to create tables in their documents to easily organise information in neatly aligned rows and columns.  Word tables can also be easily modified, if you need to add or delete rows or columns as your document evolves.  You can find all of these actions readily available on the left of the Layout tab attached to the Table Tools at the top-right of the screen. (These actions are also available on the right-click menu when your cursor is positioned anywhere within your table.) Indeed, if all you seek is to add a new row on the end of your table, all you need to do is to position your cursor in the last cell of your table’s last row and then press the Tab key. Your table will immediately grow by one row.

However, you might find a problem emerges if your table needs to extend beyond one page, as might be the case with a longer catalogue or phone listing.  As you table extends to a greater length, you may find that most of your table is lacking the context that is provided by the headings on your first row, as in the example below:

First NameLast NameDepartmentPositionStart Date
HughTwelftreeAdministrationAccountant22/3/2015
CarolWellingsMarketingDirector18/5/2017
KimMagnussenProductionManager27/10/18

As your table extends over two, three or more pages, you will inevitably leave behind the headings in your first row on the table’s first page. What you need is to be able to have the same headings in the first row of your table on each successive page, so that you are able to meaningfully interpret your table data on whatever page you are viewing it.  The obvious way of achieving this is to simply copy and paste the headings from the beginning of the table to the first row of the table on each following page. 

But the drawbacks to this solution are also obvious.  It would be tedious and time-consuming to do this in a long table that might run across numerous pages.  And it also becomes problematic if you subsequently add or delete rows to your table, after you have pasted your headings to the appropriate new location.  If you do modify your table in this way, it will inevitably mean that your headings will move around and will be out of place.

Happily, there is a better, faster and much more elegant solution.  You can create and build your table to whatever length you need or wish.  Then, just position your cursor anywhere in your table’s heading row.  Go to the Layout ribbon at the top-right of the Word screen and select Repeat Header Rows.  As a result, the first row of your table on each page will always display the same headings.  And this will continue be the case, even after you add or delete rows to your table as your document evolves; there will be no need to modify your table to retain your headings in the right location. Of course, if you have greater ambitions for your table, particularly if your table is intended to contain numerical data and calculations, then maybe a better choicewould be an Excel spreadsheet. There is a strong argument to be made for using each member of the Microsoft family according to its strength, and for any task involving numbers and mathematics, Excel is really your go-to option Explore this option starting here.

Creating a Table of Contents in MS Word

Using styles, as described here, as a standard policy in your longer, more elaborate Word documents really opens up your horizons, and facilitates the simple creation of many additional features. One of the easiest and most impressive of these is a table of contents.  If you have the foresight to use styles as a standard formatting feature (i.e. Heading 1, Heading 2, Heading 3 etc.), you can then simply insert the Table of Contents field on your chosen page at the beginning of the document and have it automatically compile a table of contents, using the headings and subheadings already present in your document.  This would provide you with an enormous saving of time and effort, compared with the tedious task of having to manually type up your own table of contents in neatly aligned columns.

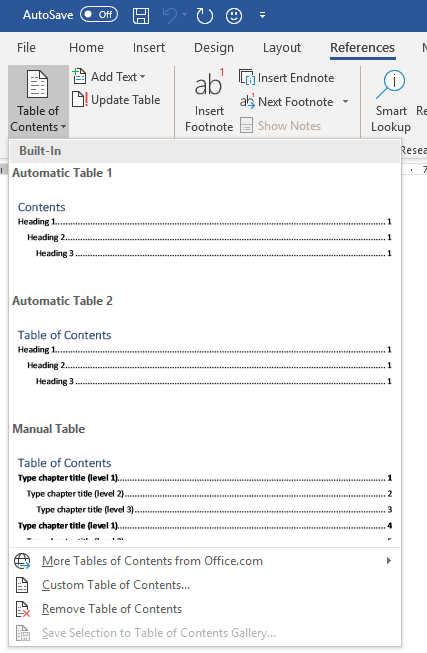
You will find the Table of Contents command on the far left of the ribbon attached to the References tab:

If you select either of the Automatic Table options (1 or 2) on the attached menu, the Table of Contents field will then go to work to automatically create the table of contents as you watch. 

One of the principal virtues of this feature is the ability to easily update and regenerate the table, in the event that you modify your document after creating the table. If you add new content with new headings or move the location of your document’s content around in a way that impacts the page numbering, you don’t need to create your contents table anew. You can instead simply update the Table of Contents field, and have it automatically regenerate itself to incorporate and take account of any recent document alterations.

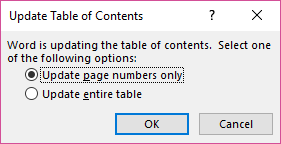
You can perform such an update via the right mouse menu, Simply right click somewhere over your Table of Contents and select Update Field. You will then be asked whether you wish to re-create the entire table or only the page numbering. (You can access this action even faster via the equivalent keyboard shortcut, the F9 key):

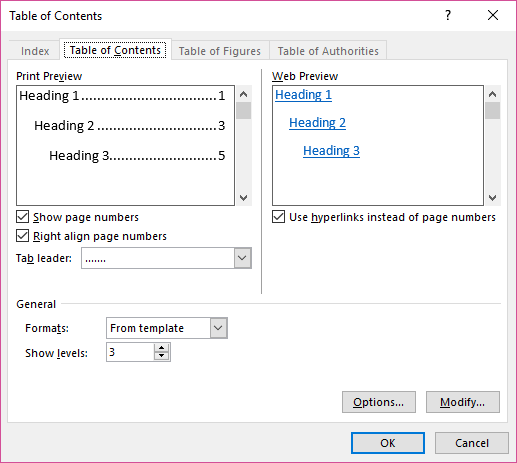
You can also customise the built-in automatic tables of content if you wish; choose a different style for its appearance and, if need be, specify precisely which Heading styles you wish to include in or exclude from your table.  You can simply select the Custom Table of Contents option from the Table of Contents menu to access a dialog box that presents you with these choices.  You can modify your Heading Style selection via the Options button in the lower right-hand corner.

Like many other fields that are available in Word, the Table of Contents gives you a great method of automating, and then flexibly updating, a key feature of your longer, more involved, elaborate Word documents.

Unlock the Power of MS Word with Styles

One crucial but rather underused feature in MS Word is styles.  Styles can provide you a powerful and streamlined method of creating and managing the formatting and presentation of your Word documents.  And the longer and more elaborate your documents become, the more beneficial and powerful styles can become for you.s

A style is simply a saved set of formatting attributes that you can assign with one click to a variety of different elements within your documents such as paragraphs, individual characters, graphics, tables and bulleted lists.  You will find yourself using styles in Word whether you want to or not; the default template that Word employs for each new blank document already has a default style called “Normal”. {Don’t they just love the word ‘Normal’ at Microsoft?)  This style dictates the initial appearance of the text you type in a new document- what font, size, colour, alignment et al it has right from the start. 

The Normal template also already has a number of different styles readily available to the user.  All you need to do is position the cursor in the paragraph you wish to format, and then click on one of the styles that are attached to the panels in the Quick Styles gallery found on the right of the Home tab.  The default styles you will see include Normal, Heading 1, Heading 2, Title and many more besides.  For a bigger choice, you can use the pull-down menu on the right of the Quick Style gallery to access a more comprehensive gallery of default styles.

You will see that using styles as your chief formatting method gives you two crucial benefits:

  1. Speed: it will give you a rapid, one-click solution to achieve repetitive formatting, particularly in your longer documents.
  2. Standardisation:  elements  in your document such as headings, paragraphs, tables and lists that employ the same style are guaranteed to look exactly the same.  In this way you can effectively create and maintain a professional uniformity throughout your documents, regardless of the ‘whims’ or erroneous formatting choices of other users.

And, furthermore, if you use styles as a foundational concept in your document design, it opens up many other automation features in Word.  For example. styles lend themselves to the simple creation of Tables of Contents, the easy enhancement and layout of graphic elements such as diagrams or pictures, and the clever creation of “phone book headers”, to mention but a few.  (More on these features in upcoming posts…)

In summary, the use of styles in Word to their full potential is perhaps the best way to differentiate the true “power” Word user from the wanna-be.