Repeating Heading Rows in a Long MS Word Table

From the very beginning, Word users have had the ability to create tables in their documents to easily organise information in neatly aligned rows and columns.  Word tables can also be easily modified, if you need to add or delete rows or columns as your document evolves.  You can find all of these actions readily available on the left of the Layout tab attached to the Table Tools at the top-right of the screen. (These actions are also available on the right-click menu when your cursor is positioned anywhere within your table.) Indeed, if all you seek is to add a new row on the end of your table, all you need to do is to position your cursor in the last cell of your table’s last row and then press the Tab key. Your table will immediately grow by one row.

However, you might find a problem emerges if your table needs to extend beyond one page, as might be the case with a longer catalogue or phone listing.  As you table extends to a greater length, you may find that most of your table is lacking the context that is provided by the headings on your first row, as in the example below:

First NameLast NameDepartmentPositionStart Date
HughTwelftreeAdministrationAccountant22/3/2015
CarolWellingsMarketingDirector18/5/2017
KimMagnussenProductionManager27/10/18

As your table extends over two, three or more pages, you will inevitably leave behind the headings in your first row on the table’s first page. What you need is to be able to have the same headings in the first row of your table on each successive page, so that you are able to meaningfully interpret your table data on whatever page you are viewing it.  The obvious way of achieving this is to simply copy and paste the headings from the beginning of the table to the first row of the table on each following page. 

But the drawbacks to this solution are also obvious.  It would be tedious and time-consuming to do this in a long table that might run across numerous pages.  And it also becomes problematic if you subsequently add or delete rows to your table, after you have pasted your headings to the appropriate new location.  If you do modify your table in this way, it will inevitably mean that your headings will move around and will be out of place.

Happily, there is a better, faster and much more elegant solution.  You can create and build your table to whatever length you need or wish.  Then, just position your cursor anywhere in your table’s heading row.  Go to the Layout ribbon at the top-right of the Word screen and select Repeat Header Rows.  As a result, the first row of your table on each page will always display the same headings.  And this will continue be the case, even after you add or delete rows to your table as your document evolves; there will be no need to modify your table to retain your headings in the right location. Of course, if you have greater ambitions for your table, particularly if your table is intended to contain numerical data and calculations, then maybe a better choicewould be an Excel spreadsheet. There is a strong argument to be made for using each member of the Microsoft family according to its strength, and for any task involving numbers and mathematics, Excel is really your go-to option Explore this option starting here.

Section Breaks in MS Word

One of the key foundation concepts that separates the genuine Word guru from the wanna-bee is the judicious use of section breaks in your longer, more elaborate documents.  Taken together with the use of styles, as discussed here, they create a very useful platform in the design and structure of your Word document that makes many other features possible or at least much easier.

Your longer Word documents are bound to contain clear subdivisions. An obvious example would be chapters in a report or manual (or even novel, should your ambition lead you in that direction).  If you separate your document’s chapters with a section break, it gives you the power to treat individual chapters effectively as individual mini-documents within the whole document.  Which means that your chapters could have attributes that, without section breaks, can only be applied to entire documents.

For example, individual sections can have their own unique vertical alignment, margin measurements, page numbering and headers and footers among many other features.  In this way, having separate sections in your document gives you the ability to effectively ‘mix and match’ different layouts and page formats within the same document.  If necessary, each section can function as a separate entity on its own within the document, so you could modify (add to, or delete from) the content of one of your chapters without having any effect on the content or pagination of any other chapter.

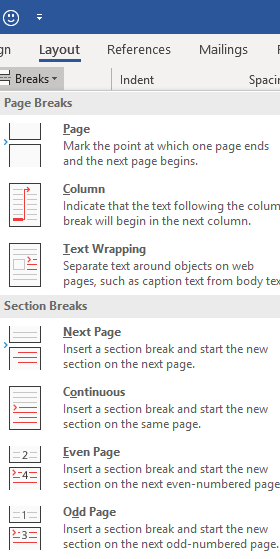
To insert a section break, you need only position your cursor at the required location, such as the intended beginning of a chapter. Find the Breaks menu on the Layout tab, and you will see a selection of different breaks, the first of which is the ordinary manual page break.  It should be stressed that this is entirely separate and distinct from the section break; you can, and very likely will, have many separate pages within the self-same section.  The manual page break simply determines where a new page begins; it does not begin a new section.

There are a number of different breaks you can easily insert via this menu, with the exception of lunch or coffee breaks. (Oh stop it, you wacky funster – Ed.) If you are seeking to separate chapters, the most relevant option would normally be the Next Page section break, the first choice in the lower part of the menu which means that your new chapter would begin at the beginning of a new page.

If you do divide your document into self-contained sections, you may find it useful to add the section indicator to the status bar at the foot of the Word screen; otherwise, you may not be able to easily tell which section you are currently located in a long document.

Simply right-click anywhere in the status bar and select Sections from the ensuing menu to turn on the section indicator; Word does not display this indicator by default.  By keeping one eye on this indicator as you move around your document, you will always know precisely what section, as well as what page, you are on.

Look out for future posts which will delve more deeply into the use of section breaks in conjunction with headers and footers.

Word: In the Beginning Was…

Microsoft Word was, and still is, the “big daddy” of word processing software, and has always been both the talisman and the lightning rod of the MS Office family.. Microsoft has fine-tuned and tweaked Word over the course of its evolution through many iterations, and this evolution has not always met with universal acclaim. In its time, it has inspired more than its fair share of gnashed teeth and bitter tears. Schrodinger’s Cat acknowledges this, but asks that you explore the posts below, and take the time to explore some of Word’s broader horizons and its true potential.

Some of Word’s critics have declared it, in this hyperbolic Trumpian age,to be the “enemy of the people”. The Guardian’s Jason Wilson agrees, Here’s my take.

And as a follow-up to Wilson’s viewpoint, here is The Guardian’s Alison Flood on the surging popularity of the Times New Roman font as the preferred font, or otherwise, of many famous authors

Use styles to really make Word work for you.

Read all about using section breaks in Word documents – both why and how.

Create a Table of Contents in your Word document by taking advantage of styles

Use this hidden trick to print a list of Word keyboard shortcuts.

Use this handy feature to easily repeat the heading rows in a Word table

Printing a List of Keyboard Shortcuts in MS Word

The most recent incarnations of Microsoft’s Office desktop software boast a large and ever-expanding array of commands and features.  The enduring problem is: how to find and activate all of these fantabulous features?  With enough patience and perseverance you can track them down, hidden away in Microsoft’s typically labyrinthine nest of tabs and ribbons, but all too often this can be a frustrating hit-and-miss endeavour, for it seems the choice of location for many commands doesn’t seem to conform to any recognisable system of logic known to homo sapiens.

Happily, there can be another way for Office users to circumvent Microsoft’s intimidating tabs and ribbons, especially for “old-school” PC users and veterans of the ‘pre-mouse’ era. Most of the commands in your mainstream MS Office program (e.g. Word, Excel, Outlook et al) can be activated via an equivalent keyboard shortcut; many of these are familiar and can be used to the same effect in most MS programs. (for example Ctrl+ C for copy, Ctrl + X for cut, Ctrl + Z for undo).  The problem is: how is the average new user supposed to know what keyboard combinations do what?

Fortunately there exists, at least in Microsoft Word, a clever, “hidden” way of easily and instantly generating an exhaustive listing of keyboard shortcuts.

The >Macro> dialogue box in Microsoft Word

Word offers its users a means of automating and standardising routine procedures, via macros that the user can record and then play back as a single action. However, there are also pre-designed macros that are built into Word by default in a library called Word commands.  You can locate this library by selecting Macros from the right of the ribbon attached to the View tab. (Why is it found on the View tab? See my earlier observation regarding Microsoft logic.)  If you select Word commands from ‘Macros in..’ menu half-way down this dialogue box, you will find one of the macros therein is called “ListCommands”.  If you select this macro, and then click on the Run button on the upper right,you will be prompted to create a document that lists all the keyboard settings in Word.  This macro will actually a produce a brand new document containing a large table with a comprehensive listing of all of Word’s keyboard settings.  You can then readily print out the resulting document, and by so doing, create a resource that might mean that you never need go near a Word tab or ribbon again.