

One of the key foundation concepts that separates the genuine Word guru from the wanna-bee is the judicious use of section breaks in your longer, more elaborate documents. Taken together with the use of styles, as discussed here, they create a very useful platform in the design and structure of your Word document that makes many other features possible or at least much easier.
Your longer Word documents are bound to contain clear subdivisions. An obvious example would be chapters in a report or manual (or even novel, should your ambition lead you in that direction). If you separate your document’s chapters with a section break, it gives you the power to treat individual chapters effectively as individual mini-documents within the whole document. Which means that your chapters could have attributes that, without section breaks, can only be applied to entire documents.
For example, individual sections can have their own unique vertical alignment, margin measurements, page numbering and headers and footers among many other features. In this way, having separate sections in your document gives you the ability to effectively ‘mix and match’ different layouts and page formats within the same document. If necessary, each section can function as a separate entity on its own within the document, so you could modify (add to, or delete from) the content of one of your chapters without having any effect on the content or pagination of any other chapter.
To insert a section break, you need only position your cursor at the required location, such as the intended beginning of a chapter. Find the Breaks menu on the Layout tab, and you will see a selection of different breaks, the first of which is the ordinary manual page break. It should be stressed that this is entirely separate and distinct from the section break; you can, and very likely will, have many separate pages within the self-same section. The manual page break simply determines where a new page begins; it does not begin a new section.
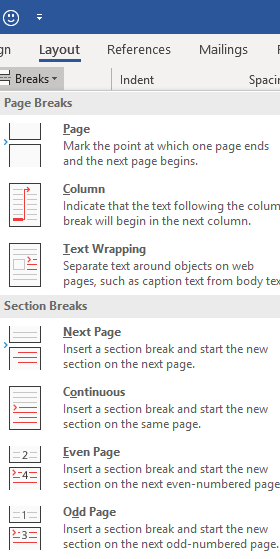
There are a number of different breaks you can easily insert via this menu, with the exception of lunch or coffee breaks. (Oh stop it, you wacky funster – Ed.) If you are seeking to separate chapters, the most relevant option would normally be the Next Page section break, the first choice in the lower part of the menu which means that your new chapter would begin at the beginning of a new page.
If you do divide your document into self-contained sections, you may find it useful to add the section indicator to the status bar at the foot of the Word screen; otherwise, you may not be able to easily tell which section you are currently located in a long document.
Simply right-click anywhere in the status bar and select Sections from the ensuing menu to turn on the section indicator; Word does not display this indicator by default. By keeping one eye on this indicator as you move around your document, you will always know precisely what section, as well as what page, you are on.
Look out for future posts which will delve more deeply into the use of section breaks in conjunction with headers and footers.
With his towering angular physicality, and mildly eccentric obsessiveness, Bill Nighy has come to embody a quintessential cinematic Englishness in a fashion that a previous generation might associate with Alastair Sim or Dirk Bogarde. Sometimes Always Never, Carl Hunter’s debut feature, finds Nighy in good form as Alan, a fastidious sixty-something tailor with a 70s era board game obsession, engaged in a long and fruitless quest to find his eldest son Michael, whom he hasn’t seen since the former deserted the family home apparently after a Scrabble inspired feud. In this quest he is joined with seeming reluctance by his other son Peter (Sam Riley), and as the film opens the pair are visiting a morgue in Brighton to identify an unidentified body which they are led to believe might be the long-lost Michael.
This seems, on the surface, like dark, gut-wrenching territory better suited to Mike Leigh, but Hunter directs the film, from a script by Frank Cottrell Boyce, with a light touch and a note of whimsy that is at odds with what could easily be a fraught family drama. This whimsical approach extends to the cinematography and production design; even though the film’s setting is contemporary, the set design and props are unmistakably retro as if to evoke the 70s, as if to suggest that the characters, Alan especially, are frozen in a former time and unable to move on and confront an uncomfortable modern world. Alan, after all, is a bespoke gentleman’s tailor by profession, an occupation that itself belongs to a passing age; the film’s enigmatic title comes from tailor’s parlance describing the convention of utilising the three buttons on the front of a man’s jacket. Alan’s obsession with Scrabble also suggests a defiantly retrograde world view, with one of his few concessions to modernity being his proclivity to play Scrabble on-line on his grandson’s computer. This character quirk furnishes one of the film’s key plot points, as Alan comes to believe that one of his anonymous on-line opponents is actually Michael reaching out to him. The resolution to this should not surprise the attentive viewer, but one suspects that it is not the intention.
The distinctive retro style that is intrinsic to Hunter’s visual style seems to extend to the casting of supporting roles. Tim McInnerney and Jenny Agutter, both actors who seem to likewise embody a bygone age, play Arthur and Margaret, a reticent couple encountered by Allan and Peter in their Brighton hotel who are implausibly engaged on the exact same grim mission as they; Margaret reappears later in the film in an equally unlikely reprise. And just as unlikely is the unexpected and largely superfluous cameo by Alexei Sayle, which seems tacked on and, while amusing, does nothing to advance the screenplay, which at times seems to meander aimlessly, and is just a trifle too besotted with its own determined quirkiness.
Nighy is an immensely watchable actor, and his presence gives the film much of its energy and impetus even if his quest seems diffident and less than earnest, but notwithstanding his sterling efforts, and despite a promising beginning, the screenplay seems run out of puff well before the end. And thus is the viewer is left to ponder what its ultimate purpose is other than a labored retelling of the Biblical parable of the prodigal son. There are a number of subplots which are frustratingly left as loose threads, such as Margaret’s and Alan’s confused extramarital dalliance, which seems very contrived and quite at odds with all that the audience has hitherto learnt about these characters. Much the same can be said of a tepid romantic subplot involving Allan’s grandson (Louis Healy) and a classmate [Ella Grace Gregoire), just another underdeveloped plot element that fails to cohere into a more satisfying whole. The film’s denouement arrives in a scene that seems deliberately to evoke Ingmar Bergman’s The Seventh Seal, but the viewer is left uncertain whether this homage is meant to be ironic, or a sincere pointer to a deeper existential truth that sits oddly with the film’s oh-so-English glibness.
Sometimes Always Never is at pains to create its own unique world which exists at a tangent to reality, but despite some fine performances and a spasmodically wry and witty script, at the end the viewer is left at the end with the impression of an underdone first course, and a dessert course that never actually arrives.
Using styles, as described here, as a standard policy in your longer, more elaborate Word documents really opens up your horizons, and facilitates the simple creation of many additional features. One of the easiest and most impressive of these is a table of contents. If you have the foresight to use styles as a standard formatting feature (i.e. Heading 1, Heading 2, Heading 3 etc.), you can then simply insert the Table of Contents field on your chosen page at the beginning of the document and have it automatically compile a table of contents, using the headings and subheadings already present in your document. This would provide you with an enormous saving of time and effort, compared with the tedious task of having to manually type up your own table of contents in neatly aligned columns.
You will find the Table of Contents command on the far left of the ribbon attached to the References tab:
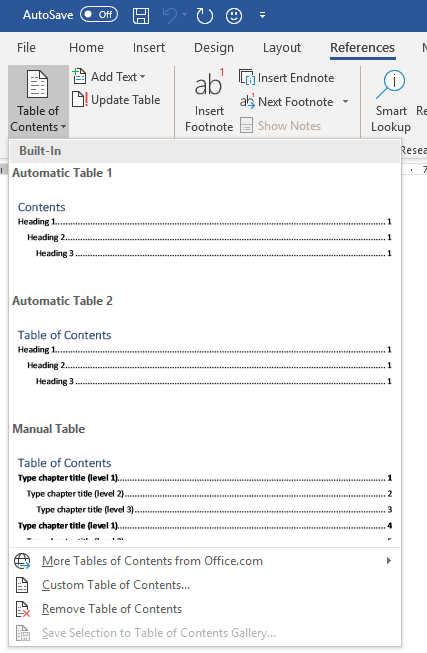
If you select either of the Automatic Table options (1 or 2) on the attached menu, the Table of Contents field will then go to work to automatically create the table of contents as you watch.
One of the principal virtues of this feature is the ability to easily update and regenerate the table, in the event that you modify your document after creating the table. If you add new content with new headings or move the location of your document’s content around in a way that impacts the page numbering, you don’t need to create your contents table anew. You can instead simply update the Table of Contents field, and have it automatically regenerate itself to incorporate and take account of any recent document alterations.
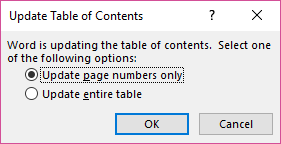
You can perform such an update via the right mouse menu, Simply right click somewhere over your Table of Contents and select Update Field. You will then be asked whether you wish to re-create the entire table or only the page numbering. (You can access this action even faster via the equivalent keyboard shortcut, the F9 key):
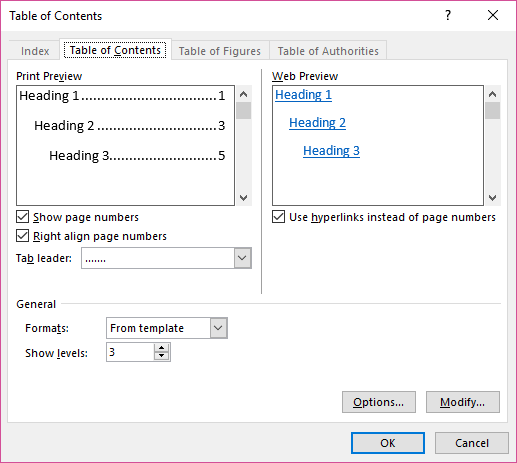
You can also customise the built-in automatic tables of content if you wish; choose a different style for its appearance and, if need be, specify precisely which Heading styles you wish to include in or exclude from your table. You can simply select the Custom Table of Contents option from the Table of Contents menu to access a dialog box that presents you with these choices. You can modify your Heading Style selection via the Options button in the lower right-hand corner.
Like many other fields that are available in Word, the Table of Contents gives you a great method of automating, and then flexibly updating, a key feature of your longer, more involved, elaborate Word documents.

Schrodinger’s Cat is the resident mascot and guiding spirit of this blog. Having “survived” , hypothetically of course, Erwin Schrodinger’s (in)famous thought experiment, his new mission is to provide expert advice, tips and solutions for users of the Microsoft Office suite of desktop applications.
A knowledge and mastery of the advice contained herein will, among other things:
give you much greater confidence, and much less frustration. in dealing with the numerous challenges that the routine use of the MS Office will confront you with
enable you to explore and utilise some of the approximately 70% of potential use of programs such as Word and Excel, which goes ignored and overlooked by the average user
earn you the lifelong awestruck respect and admiration of your colleagues, friends and family. (Well, maybe – other factors might influence this, so no guarantees.)
Explore my evolving archive of MS Office knowledge:
To read more of the musings and wisdom of Schrodinger’s Cat, go here.
In addition to his other accomplishments, Schrodinger’s Cat is also a dedicated cinephile. This accomplishment is all the more remarkable given that most cinemas today have strict prohibitions on the admission of hypothetical cats. This, of course, is just one of the many overtly discriminatory impediments that our society places in the path of imaginary beings.
Of course, the compensating advantage working in favour of Schrodinger’s Cat is that, being entirely hypothetical, he is also completely invisible, so sneaking into cinema screenings is a relatively straightforward matter.
Feel free to explore his musings and ruminations on these recent cinema releases:
Michael Moore’s exploration, and excoriation, of Donald Trump’s America in Fahrenheit 11/9
Ryan Gosling puts his best square jaw forward in the Neil Armstrong biopic First Man
Melissa McCarthy forges an extraordinary performance in Can You Ever Forgive Me
A tale of royalty and rivalry in The Favourite
Christian Bale disappears into the character of Dick Cheney in Vice
Bill Nighy in a finely tailored role in Sometimes Always Never
Taron Egerton becomes airborne, sometimes literally, in the Elton John biopic Rocketman
Quentin Tarantino contrives an alternative, “fairytale” version of recent American history in Once Upon a Time in Hollywood
Brad Pitt and Tommy Lee Jones are an estranged astronaut father and son in the sci-fi epic Ad Astra
Sam Mendes follows two young World War 1 soldiers on a perilous mission in a single shot in 1917
Frances McDormand hits the highway and crosses paths with fellow travelers in an anything but typical ‘road’ movie: Nomadland
Harry McQueen and Florian Keller produce contrasting portrayals of characters battling dementia in Supernova and The Father
Daniel Craig is finally shaken and stirred in his spectacular sign-off from the James Bond franchise in No Time To Die
Denis Villeneuve is the latest filmmaker to attempt to bring Frank Herbert’s reputedly unfilmable novel to the screen in his long-awaited version of Dune
Keanu Reeves as Neo and Carrie Ann Moss as Trinity are given a new lease on life (or something like it) in The Matrix Resurrections
Kenneth Branagh explores his own family origins in the semi-autobiographical Belfast
Baz Luhrmann offers his distinctive take on rock music’s original superstar in Elvis
Excel is Microsoft’s “killer app”, an indispensable tool for spreadsheet users from all walks of life. Explore the posts below, my human friends, if you seek to unlock the true potential of Excel:
Create a growth series of values in Excel
Create your own personal Autofill series in Excel to save yourself time and effort in repetitive typing
Add some pizzazz to your spreadsheets with some conditional formatting
Take your conditional formatting a step further
Perform some clever date arithmetic in Excel
Make an Excel page “very” hidden
A “warp speed” shortcut to create simple charts in Excel
Extract data for easier manipulation with Flash Fill
Create and modify sparklines to add some additional visual impact to your spreadsheet presentation
Safeguard and protect your valuable spreadsheet content from sabotage, inadvertent or otherwise, by protecting your spreadsheet in Excel
Add some Validation rules to your spreadsheet to ensure that your fellow users only input valid, correct data in the appropriate location

Microsoft Word was, and still is, the “big daddy” of word processing software, and has always been both the talisman and the lightning rod of the MS Office family.. Microsoft has fine-tuned and tweaked Word over the course of its evolution through many iterations, and this evolution has not always met with universal acclaim. In its time, it has inspired more than its fair share of gnashed teeth and bitter tears. Schrodinger’s Cat acknowledges this, but asks that you explore the posts below, and take the time to explore some of Word’s broader horizons and its true potential.
Some of Word’s critics have declared it, in this hyperbolic Trumpian age,to be the “enemy of the people”. The Guardian’s Jason Wilson agrees, Here’s my take.
And as a follow-up to Wilson’s viewpoint, here is The Guardian’s Alison Flood on the surging popularity of the Times New Roman font as the preferred font, or otherwise, of many famous authors
Use styles to really make Word work for you.
Read all about using section breaks in Word documents – both why and how.
Create a Table of Contents in your Word document by taking advantage of styles
Use this hidden trick to print a list of Word keyboard shortcuts.
Use this handy feature to easily repeat the heading rows in a Word table
One very ‘in-demand’ type of calculation in Excel is date arithmetic, which is often an integral part of invoicing or budgeting. You want to display dates that will occur after a given time period in relation to another given date. For example, you might seek to answer a question such as: what will the date be three months from now? And rather than having to manually enter or update the date in question each time, have this calculation built in your spreadsheet via a formula. Here’s how:
Excel’s TODAY function is a simple way of taking today’s date from your computer’s clock and displaying it in a cell in your spreadsheet. All you need to do is type =TODAY() as follows into a cell and press Enter to see the result:
=TODAY()
However, the key consideration is that Excel treats all date/time values as numbers, for all calculation purposes, which can complicate your attempt to add another amount to an existing date. For example, if you want to add 3 months on today’s date, you need to be aware that in Excel, the basic unit of a date value is an individual day; which means that, simply adding the number 3 on to today’s date will display the date 3 days from now. Which would be just fine, if that be your intention. However, to be able to choose which date/time interval to use in your calculation, you need to incorporate other Excel date functions.
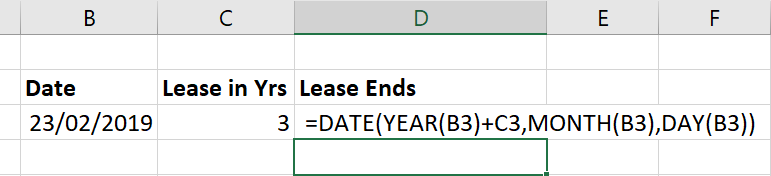
You can use functions such as YEAR, MONTH and DAY to break a date value down to its constituent components, and then add your chosen value to the appropriate component. You can then use another of Excel’s date/time functions, the DATE function, to compile these individual components (year, month and day) into the desired date result. Let’s consider the example below, assuming that cell B3 contains the current date and the adjacent cell C3 contains a number of years. The YEAR function will extract the year from B3 as a separate individual value, and you can then add the required number of years on to this value specifically. In the result cell, you can then incorporate the YEAR function along with the DAY and MONTH function as parts within the DATE function to calculate the desired result, as seen below:
In this way, you can manipulate date values in Excel to produce the desired type of elapsed time measurements, and this method should produce this result:
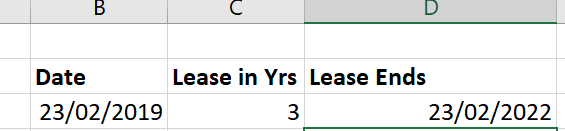
Not as simple and intuitive as it might be, but it works!
Conditional Formatting in Excel can be used in a variety of ways that can go far beyond simply adding an extra visual emphasis to your important values. For example, you can use it to give pictorial expression to the trend created by a data series in a spreadsheet. This option can be found further down the main conditional formatting menu, and you can apply it in one of three ways:
If, for example, you wanted a visual representation of the differential created by the trend in a series of monthly results; you can do this by applying your choice of Data Bars to the range in question.

The extent and degree of shading in each cell is determined by the value it contains, compared to the other numbers in the same range. The higher numbers in the trend exhibit a much higher degree of shading than do the lower ones. This gives you a method of visually portraying the trend in these numbers, giving your spreadsheet much greater impact than just displaying the bare numbers alone on the screen or page.
If you find that the coloured data bars don’t quite do it for you, there are two other alternatives available on the same menu:
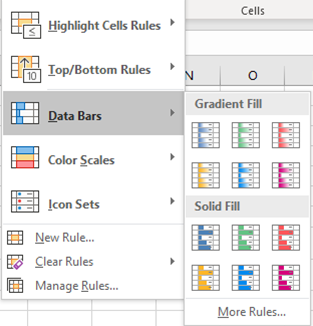
You could go with colour scales, whereby you can represent the same trend with entirely different colours for the higher, lower and in-between numbers. Or you could instead go with Icon Sets and display different symbols such as flags or arrows alongside numbers at different points in the trend. With any of these choices, you can add a crucial extra visual dimension to your spreadsheet’s presentation. Which can be particularly useful if you find yourself reporting to a person who sees many spreadsheets in the average day, so much so that they blend together in one homogeneous Excel-y mass. Conditional formatting is a surefire way of making your spreadsheets stand apart from the crowd!
This assumes ,of course, that you want your spreadsheets to command this sort of attention. And one assumes that you do, at least occasionally, otherwise why would you be reading this post?
Should you wish at a later stage, to edit or modify these conditional formatting rules, you can do so as with any rule – via the Manage Rules option on the Conditional Formatting menu. This dialog box contains both Edit and Delete buttons.
(Bear in mind that you cannot delete conditional formatting via the usual Delete key on your keyboard; this will clear the contents of cells, not the formatting.)