

The English director and writer Sam Mendes sets his new World War I epic on the ravaged and scarred battlefields of the Western Front in early spring of the year that gives his film its name. Two young corporals, Blake (Dean Charles Chapman) and Schofield (George Mackay) are sent on a perilous mission to prevent another battalion from being sent obliviously into an ambush, as engineered by a strategic German withdrawal. Aerial reconnaissance has alerted the young corporals’ commanding officer, General Erinmore (Colin Firth) to the enemy ruse, and the fact that Blake’s own brother is a member of the doomed battalion adds a piquancy and urgency to the mission for him that is lacking for his seemingly more war-weary companion.
The two corporals are obviously friends and have an easy rapport and banter, although we never know their first names or much of their backstory. This is perhaps a deliberate ploy by Mendes, as was the decision to have two lesser known actors play these two principal roles and carry the film’s entire narrative. There is a marked contrast in stature between them and the cameos by English acting heavyweights such as Firth, Andrew Scott, Mark Strong and Benedict Cumberbatch that punctuate the film at regular intervals. The lasting impression is perhaps intended to be of two “Everymen” who are left to endure the various and plentiful horrors of trench warfare with only their own sense of duty, and reliance on each other, to sustain them.
Unfortunately, the lack of backstory, meaningful character development or much memorable dialogue means that the audience doesn’t feel much engagement with the two main protagonists. Their fate, even though it is the film’s sole reason d’etre, tends to take a back seat to the central technical conceit – the illusion of being shot in a continuous single take. Mendes, of course, is no stranger to this type of cinematic trickery; the opening sequence in Spectre (2015) also employed the same single shot artifice, but there it provided what was the only talking point in an otherwise lack-lustre, unremarkable Bond instalment. In 1917, the continuous shot cinematography is sustained for the film’s entire length. It is certainly an impressive technical achievement and is designed to give the myriad horrors and confronting brutality of the battlefield an immediacy and immersive quality by putting the audience quite literally in the shoes and at the shoulder of the two soldiers. But the film’s technical sophistication has the effect of undercutting any truly immersive quality. The depiction of the grimy, blood-caked, corpse-strewn realism of trench warfare is meant to be overt and realistic, and it certainly is, but the showy nature of the film’s technical aspirations subverts any attempt at naturalism by so constantly drawing attention to itself.
There is still much to admire, particularly in the artfully managed set pieces where the single shot cinematography is shown to its best effect. Most notable among these is the sequence where the two soldiers have a seemingly random encounter with the (albeit temporary) survivor of an aerial dogfight, an encounter with dire and fateful consequences for one of the protagonists. The sheer audacity of the logistics and choreography involved in this this sequence is an extraordinary cinematic achievement in itself. Other scenes seem at odds with the movie’s erstwhile grisly setting by depicting a transcendent, almost surreal beauty. One of these scenes is of a devastated, evacuated village bathed in an eerie, luminous beauty at night; the camerawork by veteran cinematographer Roger Deakins has been deservedly nominated for an Oscar. The production design, too, is impressive; the portrayal of the Danteesque hellscape of No Man’s Land that the two soldiers must traverse may be graphic and unsparing, but the exposure of similarly forensic depictions of total war in such films as Platoon (1986) and Saving Private Ryan (1998) may have inured contemporary audiences to such scenes. However, at other times, the film’s abiding technical conceit is so obvious and transparent that its impact is inevitably diminished. And it is, of course, a conceit, however proficiently executed. There are numerous editing points, most expertly camouflaged, but one in particular so jarringly obvious that it provoked an audible groan in the session I attended.
Whilst there is much to admire in Mendes’ film, its most striking achievements would appear to be technical and technological, rather than more satisfying and dramatic, and the overall impression it leaves is of a film that is just a little too enamoured with its own technique. The main cinematic conceit of the single shot illusion is masterfully and successfully sustained, but seemingly at the expense of coherent storytelling, character development and convincing dialogue. Whilst 1917 is, in most respects, a superior film to Mendes’ preceding venture, Spectre, it does share that film’s main shortcoming: a superabundance of style over substance.
One underused, very neglected feature in Excel is sparklines. When you want to portray a trend in the numbers in your spreadsheet, the best option is to give it a visual dimension, so that it has a much greater impact on the viewer than just showing numbers on a screen (or page). The obvious avenue to pursue might be to create a chart, and certainly Excel contains a very powerful and elaborate charting facility, that you could employ to serve this need to great effect. However, you may want a simple pictorial representation of the trend that your numbers convey without wanting to invest the time and effort that a full-scale chart might require.
In this case, a sparkline might do just the job that you seek. The best way to envisage a sparkline is as a miniature chart that occupies no more than a single cell adjacent to the numbers. The sparklines feature resides on the Insert tab in Excel, just over the halfway point, not far from the charting options. Perhaps this location, so close to the more commonly used charting creation commands, helps to explain why sparklines tend to be neglected and somewhat underutilised by many Excel users. (Two of the sparkline options are labelled as ‘line’ and ‘column’ and so, inevitably, they are confused with the charting features that carry the same name and are very nearby on the same ribbon.)
Sparklines are very simple to create. You need only select the first individual cell in the destination range that you intend to populate with sparklines. Then, go to the Insert tab and locate the Sparklines group, slightly further than halfway along the ribbon. You have an initial choice of three types of sparkline: line, column or win/loss. (If you are unsure of which type of sparkline will work best, you need not be concerned; you are not “locked in” to your first choice. You can always revisit your choice at any time, and if need be, change your existing sparkline to any of the other options.)
When you select one of the three sparkline options, Excel will ask you for the spreadsheet range that you will base your first sparkline on, and the cell or range you intend to place your sparkline in:
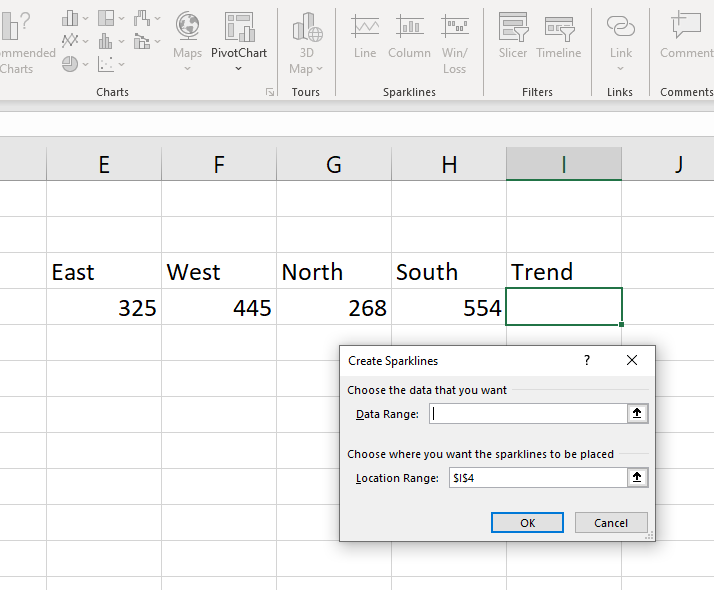
As you can see, the contents of the Location Range box will be the cell you have already chosen. You just need to place your cursor in the Data Range box, and then select the range that contains the numbers that you wish to use for your sparklines. In the example above, the Data Range is E4:H4.) Then, select OK and the Location Range cell will display your sparkline result. If you wish to copy the sparkline into an adjacent range of cells, you can use the small green “fill handle” in the lower right corner to easily accomplish this.
To modify your sparkline, you can simply select the cell (or cells) that contain the sparklines, and you will find a Sparklines tab suddenly becomes available at the top of your screen. The Sparklines tab is a ‘contextual’ tab that only appears when the user selects cells that already contain sparklines. The attached ribbon presents a range of options that allow you to modify your sparklines, including another chance to choose from the original three sparkline varieties, a style gallery, and the capacity to attach and colour-code markers on various data points on your sparkline. The options available to you on the sparklines ribbon can be seen on the example below:

Sparklines provide you with a fast and flexible way to add an extra visual dimension to your spreadsheet presentation.